Ultimaker UltiMaker S Series Pro Bundle Upgrade


Already own an UltiMaker S5 or S6 Dual Extrusion 3D printer, but want to upgrade your setup to the next level with the outstanding Pro Bundle accessories? This Pro Bundle Upgrade is what you are looking for! To create a safer and more controlled build chamber, the UltiMaker Air Manager provides a physical barrier to the open top of the UltiMaker S5 and S6, an intelligent fan, and an air filtration unit. The Materials Station attaches to the bottom of the UltiMaker S5 or S6, allows users to load up to six spools of 3D printing filament at once, and will automatically load and unload your 3D printing filament to each printhead to unlock true 24/7 production capabilities. Together, the UltiMaker Air Manager and UltiMaker Materials Station take your Ultimaker S5 3D printer to the next level of production capabilities. Get both accessories for your Ultimaker S5 or S6 3D Printer with this bundle.
| List Price: | $5,103.16 |
|---|---|
| Price: | $4,848.00 |
| Price: | $... |
| Order Now: | Ships calculating... Free U.S. Shipping |
*Please note: this bundle does NOT include an UltiMaker S5 or S6 3D Printer, ONLY the Air Manager and Materials Station. If you would like to purchase an UltiMaker S5 or S6 3D Printer in addition to the accessories, see the listing for the UltiMaker S5 Pro Bundle here*

The UltiMaker S5 Pro Bundle can easily and safely be used anywhere inside your business.
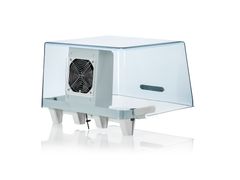
PRINT WITH PEACE-OF-MIND AND CONFIDENCE WHEN YOU ADD THE ULTIMAKER AIR MANAGER TO YOUR ULTIMAKER S5 or S6
To help keep temperatures, fumes, and airborne ultrafine particles contained--and to keep curious hands and foreign objects out--the UltiMaker Air Manager for the UltiMaker S5 3D printer is your answer. It features an E10 EPA filter mounted behind a controlled fan to catch up to 95% of ultrafine particles emitted during the 3D printing process. The intelligent fan communicates with the UltiMaker S5 so that the air control settings are exactly right for the material you are 3D printing with. Over time and use, the EPA filter will eventually need to be replaced, so the UltiMaker S5 will monitor, record, and prompt users to replace the filter when the time comes. Installing this accessory on your UltiMaker S5 is easy; simply update your UltiMaker S5 firmware to the latest version, attach the Air Manager according to the provided instructions, and the Air Manager will be automatically detected and ready to use. Thanks to the fully-enclosed and temperature-controlled build chamber created by adding the UltiMaker Air Manager to your UltiMaker S5, you can 3D print those tricky materials with confidence knowing that lifting, delaminating, and warping are now minimized.

ENHANCE YOUR PRODUCTION POTENTIAL WITH THE ULTIMAKER MATERIALS STATION
Take your 3D printing materials handling to the next level with the UltiMaker Materials Station for the UltiMaker S5 and S6 3D printers. This feature-rich accessory will simplify your 3D printing workflow with efficient and reliable solutions. The humidity-controlled, front-facing bay is capable of holding up to 6 spools of 3D printing filament at once; and each slot features automatic and assisted loading to either printhead, abrasion-resistant dual drive gears for feeding any kind of 3D printing filament, a flow sensor to detect jams and run-outs, NFC material recognition on UltiMaker brand 3D printing filaments, and support for third-party filaments up to 1kg in size. When one spool of filament runs out on either printhead, perhaps even during a 3D printing job, the Materials Station will automatically detect this, load the next spool, and communicate with the UltiMaker S5 or S6 to continue 3D printing where it left off. Adding the UltiMaker Materials Station to your UltiMaker S5 will unlock true 24/7 production potential with elegance and confidence.

The UltiMaker Materials Station stores up to 6 spools of 3D printing filament to maximize the uptime of your Ultimaker S5 3D printer.
WHAT'S IN THE BOX?
- Click here to learn about what comes in the box with your UltiMaker Air Manager
- Click here to learn about what comes in the box with your UltiMaker Materials Station
TECHNICAL SPECIFICATIONS
- ***Please note: you MUST update your UltiMaker S5's firmware to the latest version before attaching the accessories***
- Click here to learn about the technical specifications of the UltiMaker Air Manager
- Click here to learn about the technical specifications of the UltiMaker Materials Station
Shipping Notice
Please note that, due to its size and weight, this product cannot be shipped to a PO Box. If you have any questions or would like help making shipping arrangements, please contact support@matterhackers.com.