
How To: 3D Print and Build an F1 RC Car
Participate in the Open RC Project and learn how to 3D print and build your own F1 RC car.

If you're an active member of the 3D printing community, you've probably heard of Daniel Norée. If you haven't heard of him, you may have heard about one of his many Open-Source projects, like the OpenRC F1 Car, the OpenRC drone, the print-in-place adjustable wrench, or everyone's favorite: Benchy. We are going to 3D print and build the F1 car.
For this particular RC car, I wanted to have a good color scheme, as well as durable parts where it was necessary. All the parts that risk breaking or getting damaged while racing around, like the spoilers and the bottom panels, are printed in Nylon X - our super strong, carbon fiber infused nylon. The rest of the aesthetic parts are printed in MatterHackers PRO Series PLA (Light Blue, Silver, and Black (for the upper and lower BOM at the front)).
Daniel Norée is kind enough to have some actual technical diagrams showing how most of the parts go together, so it's really easy to split this pile of printed part into a logical set of steps. For hardware (both fasteners and electronics), there is a kit you can buy that includes all the parts you need to assemble and control the RC car.

All the parts, printed and electronics, laid out with a little knolling.
Assembling the wheels is a little tricky and runs the risk of snapping the rims as they're squeezed into place. Be gentle but forceful in getting them to fit. They are directional though, so be sure the "shallower" side of the rims are facing outward - they should be on the same side as the rounder side of the wheel.

Front tire printed parts and after assembly.
The front wheels and their axles are easy to assemble, and are fastened together according to the diagrams supplied.

Both front wheels are assembled the same, just make two identical sets.
Once both front wheels are assembled, the front steering assembly goes together next.

The front axle and steering pins uses a lot of screws to keep this pivoting properly.
The rear axle assembly goes together easy, it just takes some alignment of the motor gear and the spur gear to have it fit properly.

The rear axle assembly is fairly straightforward and everything slides together.
The chassis is made up of the two bottom plates and both wheel assemblies, and also fastens the front servo into place.

Assembling the chassis is as simple as four screws.
Fasten the arm onto the servo using the supplied screw, and drill out the last hole on it to fit the aluminum rod. The rod should be bent around the servo first and then around the servo saver. The rubber bands were unnecessary after reprinting the Upper and Lower BOM pieces in PRO Series PLA. NylonX is too flexible for these parts, as it's designed to function off of the stiffness of PLA and use that as a spring.

The aluminum rod should be bent around the servo arm (after drilling the hole wider) and then slotted into the servo saver.
To attach the rear motor cover and the center body, inset the M3 nuts into their slots, ensuring they are jammed in far enough to be able to be screwed into. It may take some force and a hammer to get the nuts all the way seated, depending on how well calibrated your printer is. Once they're in place, screw together the two body pieces and fasten that to the base.

With a plethora of inset nuts, the rear motor cover screws together and onto the base.
Once all the mechanical parts are in place, the rest of the electronics need to be crammed in. The easiest thing to do now is attach the main body of the car, and leave the lid off.
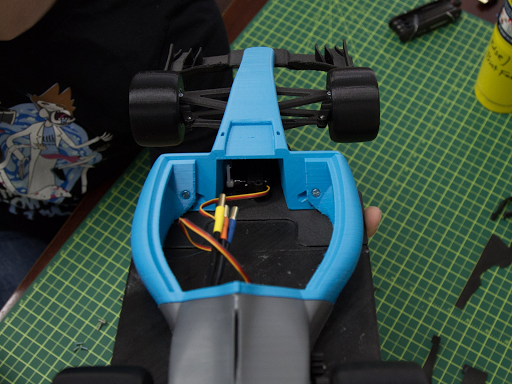
A lot of room in here to cram all the electronics.
The rest of the electronics don't really screw into or stay attached to anything, but here's how everything plugs together. Make note that the orange wire on the servo plugs into the left pin on channel one, and the white wire of the driver plugs into the left pin on channel two.

All the electronics charged and plugged in properly.
Once the battery is charged and plugged in, all you have to do is setup the controller. To do that, plug in the small connector into Channel 3 of the receiver, turn on the electronics, and once the receiver light starts blinking, hold down the "Bind" button on the controller and power it on. This should sync the two together and you can go through now and fine tune the settings of your controller.
With all that, you're off to the races!
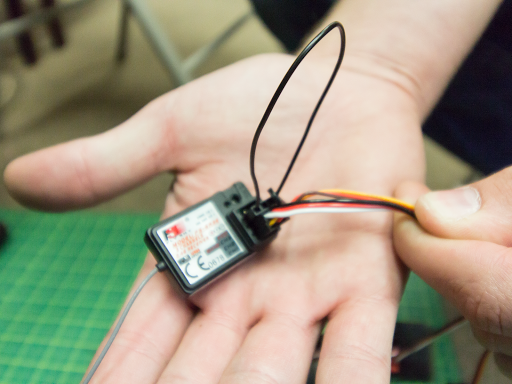
The receiver and the small plug to bind it to the remote.

Ready to race!
There you go! Several other versions of this F1 car exist, like dual extrusion bodies and alternate body shapes, like the McLaren F1. The cosmetic pieces can be swapped around the main chassis, as those pieces stay the same across the iterations Daniel has created. So get printing and assemble your own OpenRC F1 car and send us pictures of the color schemes you come up with. You can find the files for the OpenRC car project that I used OpenRC Formula 1 car.
Happy Printing!